I recently set out to see if I could build a gaming PC with a discrete graphics card that works with the 27″ Apple Thunderbolt Display. I wanted to know if it were possible and if it would run the recent relaunch of FFXIV. During my research phase, I came across many forums where people would ask if this was possible to do with a pc with a Thunderbolt port. Many people said no and would point out the politics of Thunderbolt, the lack of official drivers or confusion over sharing a connector with the Mini DisplayPort. As it turns out, you can definitely use your Apple Thunderbolt Display with a dedicated GPU with some virtualization magic.
Backstory
First, a little back story. I’ve been genuinely curious about combining an Apple Thunderbolt Display with PC components for some time given that thunderbolt effectively encapsulates PCIe and DisplayPort. It began a few years ago with the prospects of having an external GPU to power my Macbook Air coupled with the Thunderbolt Display to produce a portable and optionally powerful system. From the Thunderbolt Wikipedia page:
Thunderbolt combines PCI Express (PCIe) and DisplayPort (DP) into one serial signal alongside a DC connection for electric power, transmitted over one cable. Up to six peripherals may be supported by one connector through various topologies.
Imagine you were able to have a plug and play GTX 790 for your MacBook. You could leave the external enclosure connected to your display and have an automatic performance boost when you get back to your desk using a single Thunderbolt cable connected to your display. An even more interesting idea is that Apple should consider including a GPU inside the Thunderbolt display to automatically boost the graphic performance of a MacBook Air or Pro. Now that would awesome.
A few companies have shown prototypes of external GPU products for years but none have released a commercial product. However, recently in mid 2013, an individual produced a working setup to achieve an external GPU setup. The steps involved require some moderate hacking, boot process inconveniences, and additional expenses. Since I didn’t already own any PC components, I decided rather than attempt this eGPU build with bootcamp, I’d try to put together a complete gaming PC instead to get better overall performance and flexibility.
Putting It Together
Since there are currently no graphics cards with Thunderbolt out, only mini DisplayPort, we need to get the discrete GPU output through the motherboard’s Thunderbolt port. The trick to getting this build working is that you can virtualize your GPU and run its output through the Thunderbolt port using a piece of software called Lucid Virtu. This software is said to give you additional advantages such higher frame rates, increased Vsync caps and less screen tearing but I haven’t set up a benchmark to test. You’ll need this software to access your discrete GPU from the motherboard.
The steps to get this working are surprisingly easy as long as you follow a few guidelines. First, you’ll need a motherboard that has a Thunderbolt port and has support for Lucid Virtu MVP. The prices on these vary from $200-$500 and stocks seem kinda low. To run Lucid Virtu MVP, you’ll need a CPU with integrated graphics such as the Intel 4000. This is because you’ll need a way to have video out from the motherboard to configure your system since you will not be plugging the Thunderbolt Display into the GPU. Make sure you pay attention to this when choosing a processor or you will not be able to configure Virtu MVP.
After selecting your parts, assemble the computer as you normally would. I initially used a monitor with HDMI plugged into the GPU during setup to ensure everything was running as expected. You may be able to get this setup initially with the Thunderbolt Display if you configure the video output device in the BIOs to use the on board video. I didn’t try the Thunderbolt Display until all motherboard and Intel drivers were installed since I had a monitor connected to the GPU through HDMI.
The disk that comes with the motherboard was my best bet to get going with the drivers and software. Once everything was operating as expected, I rebooted, went to the BIOs, set the default output device to the motherboard instead of PCIe, plugged in Thunderbolt Display and booted. Upon boot, I had audio in/out and video with no effort. I think one of the keys to success is make sure you have your Intel graphics drivers and Virtu MVP up to date. I found this Gigabyte manual useful in knowing how to get the system configured.
Key Parts (~$900)
- Motherboard with Thunderbolt and Lucid Virtu GPU virtualization support
- Modern CPU with integrated graphics like Sandy Bridge and Ivy Bridge Processors
- GIGABYTE GeForce GTX 660 Ti
- Lucid Virtu MVP
- Included with the Gigabyte board and probably the others.
Additional parts
- Apple Thunderbolt Cable
- Samsung 840 Pro 128GB SSD
- Corsair Vengeance 16GB (2x8GB) DDR3 1600 MHz (PC3 12800)
- Corsair PSU
Thunderbolt Motherboard alternatives
FFXIV and Starcraft II
To get FFXIV running optimally, I had to add “ffxiv.exe” to the software list in Virtu MVP and enable borderless windowed mode in-game. After doing this, I consistently get 25-45 FPS with a 2560×1440 resolution on “maximum” or “high desktop” and 40-60 on “standard” with very little tearing. Dropping the resolution to 1920×1080 increases the frame rates by about 50%. Initially full screen mode was giving me some weird artifacts so I found the windowed mode worked best until I found out there was an update from Lucid.
I found the overall result to be very pleasing. Here are the results of the benchmark I ran.
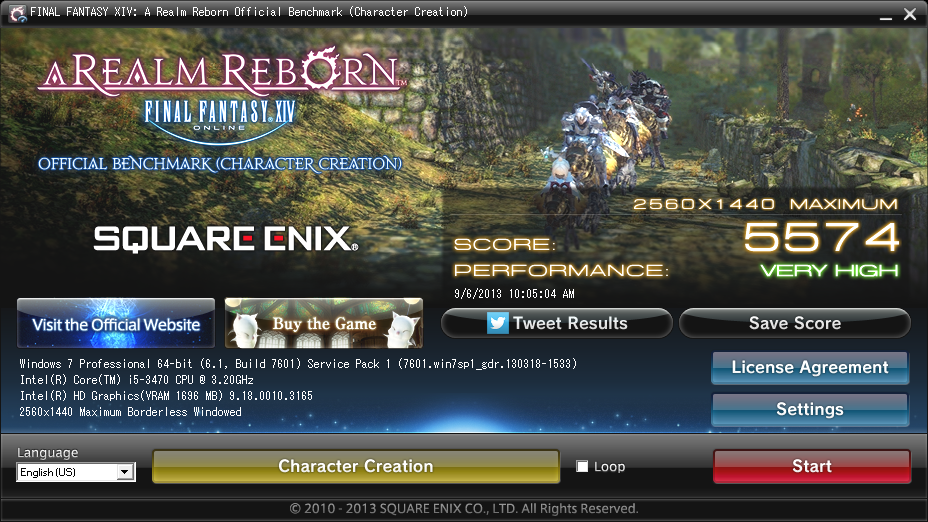
I couldn’t get Starcraft II to start without updating the Lucid software to 2.1.226.x. After doing that It ran at 2560×1440 on Ultra with a solid frame rate of 100+ FPS. Updating also allowed FFXIV to work better in full screen mode.
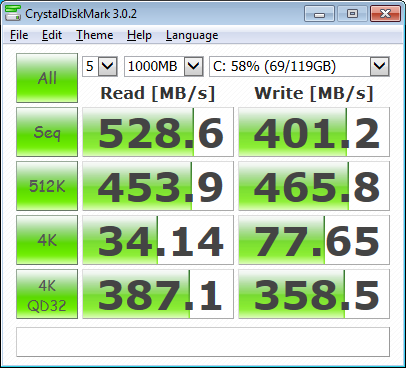
I also found the Samsung 840 Pro 128GB to perform well:
External Thunderbolt Cable
I thought it would be convenient to have one Thunderbolt cable connected to each device to minimize swapping through the built-in cable and the Thunderbolt port on the back. I purchased a cable to run between the PC and the display but it turns out that it has one issue. The Thunderbolt display will pick up the signal from whichever cord is plugged in as long as the last used cable is not still connected. So switching between computers still requires you to unplug the Thunderbolt cable from whichever device you are switching from.
Conclusion
Going forward I’d recommend this build to anyone looking to have the flexibility of a full gaming PC with an Apple Thunderbolt Display. There are a few things that I’ve outlined that could cause a roadblock if you’re not careful choosing your hardware but I’m pleased by the performance that this build gives you with little effort. I’ve had very little issues and have enjoyed numerous hours of game play so far. Remember to update Virtu MVP directly from their website. At this point, the only other things I might try are overclocking and a hackintosh. If I decide to do either, I’ll do a small write up to let you know.
Updates
I found a video from Newegg discussing a similar setup https://www.youtube.com/watch?feature=player_embedded&v=O1t7Rc9qFgI#!
29 Comments
In the event you were curious…
http://imgur.com/tJVh44O
http://imgur.com/jsWC8fo
Just threw in the Eyefinity for the hell of it.
Did you buy the Lucid virtu MVP software or is it bundled with the MB?
It came bundled with the motherboard. I’m not sure how common this is though.
I just bought the components for a build similar to this. They will arrive tomorrow 🙂 Thanks dude for this article!
Hi, great post and thanks for looking into this! I’m about to build a PC but want an apple display (my wife says they are prettier).
I’m wondering if follow your spec and get the previous 24″ display which is less than half the price of the 27″ Thunderbolt, and connect it using a thunderbolt as I read that Apple have said TB will definitely be backward compatible… but apple say a lot of crap about their products over the years!
If you have any knowledge about this or info on what I need to get to connect the mini DP Display to my build I will be forever grateful!
I haven’t tested the 24″ LED Cinema Display but it sounds like you are looking for a product called Kanex XD. http://www.amazon.com/gp/product/B003LGOWNQ/ref=as_li_ss_tl?ie=UTF8&camp=1789&creative=390957&creativeASIN=B003LGOWNQ&linkCode=as2&tag=jsndev-20 One of the reviews points out that the 24″ LED Cinema Display ONLY accepts a resolution of 1920 x 1200 so make sure that is possible before purchasing. You won’t need any of the virtualization from Lucid.
wow… as easy as that? Thanks for the info.
All the kit arrived today, they were kind enough to send me the UP5 by mistake, instead of the UP4… I’ll have to consult my conscience a bit later to see if i’m ok with keeping it!
Thanks again
Great article, about to buy my components! Just one question: can we use a more oowerful GeForce? Do you have a specific component that you would recommend, still making the thunderbolt work?
Also, is there a case you’d recommend fir all this? 🙂
I prefer the the Cooler Master HAF series like this http://www.amazon.com/gp/product/B00BCXF6MG/ref=as_li_ss_tl?ie=UTF8&camp=1789&creative=390957&creativeASIN=B00BCXF6MG&linkCode=as2&tag=jsndev-20
I don’t see any reason why a more powerful card wouldn’t work. For motherboards, stick to this list the Virtu support list and you should be fine http://www.lucidlogix.com/mvp-product-list.shtml . As noted in the article, you’ll need a CPU with onboard graphics.
Thank you Jason! FYI, I just ordered mine:
http://www.ebay.com/itm/390716232702 ^^_
Hey Jason ! This article really helped me a lot ! Are the motherboards you posted the newest ones that will make this possible, or are there motherboards that support the latest Haswell CPU’s that are Lucid Virtu MVP enabled ? Moreover, as roberto mentionned, can I throw a nvidia GTX 780 in my configuration ? Will this work ?
Thanks again for this article !
Wouldn’t it be better and cheaper to build a computer without having in mind compatibility issues with the Apple Cinema Display, like: the motherboard, cpu etc.. and buy a mini displayport adapter to dvi like so: (http://www.amazon.com/Kanex-C247DL-Inches-Display-2560×1440/dp/B005MXIK70/ref=sr_1_1?s=electronics&ie=UTF8&qid=1385972506&sr=1-1&keywords=kanex+c247DL)
Don’t you think that this device would allow me to connect my Apple Cinema Display to any GPU and be able to play games without any compromise ?
Kind regards !
It’s possible and probable for a Cinema Display since it’s Mini Display, however, I was forced to virtualize the GPU because I already owned a Thunderbolt Display and as far as I know there is no alternative for inputing a device other than Thunderbolt to it. http://reviews.cnet.com/8301-13727_7-20043524-263.html
Thanks for the quick answer !
Here’s the official mobo support list http://www.lucidlogix.com/mvp-product-list.shtml. I’m not sure how to up to date it is. Any modern Nvidia card should work.
Hi – this is a great post. I have a 2011 iMac that only works in target display mode if it receives a thunderbolt video connection. I would love to use it as a display for a gaming pc so your setup above would be perfect if it works in my situation. iMac for day to day and the PC for gaming. I don’t suppose you know if it would work or if you have the chance to try it out? Thanks again.
My assumption is that it would work very similarly to my setup but I don’t have an iMac to test with. If I find out for sure, I’ll let you know here.
Hey – thanks that would be great.
No it will not work. Imacs are different from thunderbolt displays; thunderbolt imacs’ target display mode will only work if its connected to a thunderbolt-equipped mac (be it imac, macbook pro/air, mac mini/pro) running os x. If u dual boot the same machine into windows, it will not work.
I know its bizaar but thats how it is.
Did you test it?
Did anyone ever figure out if this does or does not work with a 27″ iMac?
Why not just use HTMI to Thunderbolt adapter (e.g.
http://www.amazon.com/Monoprice-DisplayPort-Thunderbolt-Adapter-Support/dp/B0025V2VO0)
As that’s the wrong way round. You’d need a female Thunderbolt and male HDMI.
Thanks a lot for this article. Just made my computer this week-end. Took me at least 12 hours to make everything work but it’s working like a charm. I tried with a GTX780 and no problem virtu and the thunderbolt cinema display work fine. Thank you very much again
Has anyone been able to test this out with a late 2013 27 iMac to see if it would also work?
Hi. I have a similar build and have been trying for days to get my apple thunderbolt display to work. Difference is that I’m not running it through a discreet video card. I want to run it right from the mobo. I have:
gigabyte z87 ud5h th
i7 4790k
Anyway, the motherboard has two separate thunderbolt channels but I can’t seem to get the 27″ Apple Thunderbolt display to work. I don’t understand why as it’s just a mini display port anyway and the motherboard specs specify that the thunderbolt ports can be used for display reasons.
Any help would be appreciated.
Thanks!
JD
How about plucking the thunderbold display to the mini dp of a gtx 780ti ?
As far as i read is thunderbold compatible to dp ?